Measurement Errors
The measurement of an amount is based on some international standards which are completely accurate compared with others. Generally, measurement of any quantity is done by comparing it with derived standards with which they are not completely accurate. Thus, the errors in measurement are not only due to error in methods, but are also due to derivation being not done perfectly well. So, 100% measurement error is not possible with any methods.
It is very important for the operator to take proper care of the experiment while performing on industrial instruments so that the error in measurement can be reduced. Some of the errors are constant in nature due to the unknown reasons, some will be random in nature, and the other will be due to gross blunder on the part of the experimenter.
Errors in Measurement System
An error may be defined as the difference between the measured value and the actual value. For example, if the two operators use the same device or instrument for finding the errors in measurement, it is not necessary that they may get similar results. There may be a difference between both measurements. The difference that occurs between both the measurements is referred to as an ERROR.
Sequentially, to understand the concept of errors in measurement, you should know the two terms that define the error. They are true value and the measured value. The true value is impossible to find out the truth of quantity by experimental means. It may be defined as the average value of an infinite number of measured values. Measured value can be defined as the estimated value of true value that can be found by taking several measured values during an experiment.
Types of Errors in Measurement System
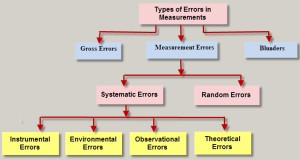
Generally errors are classified into three types: systematic errors, random errors and blunders.
Types of Errors in Measurement System
1) Gross Errors
2) Blunders
3) Measurement Errors
Systematic Errors
- Instrumental Errors
- Environmental Errors
- Observational Errors
- Theoretical Errors
Random Errors
1) Gross Errors
Gross errors are caused by mistake in using instruments or meters, calculating measurement and recording data results. The best example of these errors is a person or operator reading pressure gage 1.01N/m2 as 1.10N/m2. It may be due to the person’s bad habit of not properly remembering data at the time of taking down reading, writing and calculating, and then presenting the wrong data at a later time. This may be the reason for gross errors in the reported data, and such errors may end up in calculation of the final results, thus deviating results.
2) Blunders
Blunders are final source of errors and these errors are caused by faulty recording or due to a wrong value while recording a measurement, or misreading a scale or forgetting a digit while reading a scale. These blunders should stick out like sore thumbs if one person checks the work of another person. It should not be comprised in the analysis of data.
3) Measurement Error
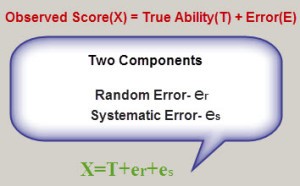
The measurement error is the result of the variation of a measurement of the true value. Usually, Measurement error consists of a random error and systematic error. The best example of the measurement error is, if electronic scales are loaded with 1kg standard weight and the reading is 10002 grams, then
The measurement error is = (1002 grams-1000 grams) = 2 grams
Measurement Errors are classified into two types: systematic error and random errors
Systematic Errors
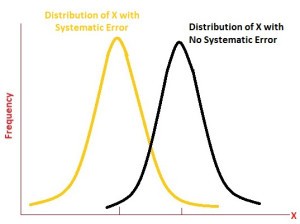
The Systematic errors that occur due to fault in the measuring device are known as systematic errors. Usually they are called as Zero Error – a positive or negative error. These errors can be detached by correcting the measurement device. These errors may be classified into different categories.
Systematic Errors
In order to understand the concept of systematic errors, let us classify the errors as:
- Instrumental Errors
- Environmental Errors
- Observational Errors
- Theoritical
Instrumental Errors
Instrumental errors occur due to wrong construction of the measuring instruments. These errors may occur due to hysteresis or friction. These types of errors include loading effect and misuse of the instruments. In order to reduce the gross errors in measurement, different correction factors must be applied and in the extreme condition instrument must be recalibrated carefully.
Environmental Errors
The environmental errors occur due to some external conditions of the instrument. External conditions mainly include pressure, temperature, humidity or due to magnetic fields. In order to reduce the environmental errors
- Try to maintain the humidity and temperature constant in the laboratory by making some arrangements.
- Ensure that there shall not be any external electrostatic or magnetic field around the instrument.
Observational Errors
As the name suggests, these types of errors occurs due to wrong observations or reading in the instruments particularly in case of energy meter reading. The wrong observations may be due to PARALLAX. In order to reduce the PARALLAX error highly accurate meters are needed: meters provided with mirror scales.
Theoretical Errors
Theoretical errors are caused by simplification of the model system. For example, a theory states that the temperature of the system surrounding will not change the readings taken when it actually does, then this factor will begin a source of error in measurement.
Random Errors
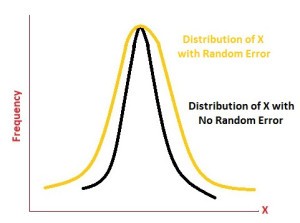
Random errors are caused by the sudden change in experimental conditions and noise and tiredness in the working persons. These errors are either positive or negative. An example of the random errors is during changes in humidity, unexpected change in temperature and fluctuation in voltage. These errors may be reduced by taking the average of a large number of readings.
Random Errors
Measurement Error Calculation
There are several ways to make a reasonable measurement error calculation such as estimating random errors and estimating systematic errors.
Estimating Random Errors
There are a number of ways to make a reasonable estimate of the random error in a particular measurement. The best way is to make a series of measurements of a given quantity (say, x) and calculate the mean and standard deviation (x ̅ & σ_x ) from this data.
The mean x ̅ is defined as

Where, Xi is the result of the i th measurements
‘N’ is the number of measurements
The standard variation is given by

If a measurement is repeated many times, then 68% of the measured valves will drop in the range x ̅ ± σ_x
We become more positive that , is an accurate representation of the true value of the quantity x ̅ . The standard deviation of the mean σ_x is defined as
σ_(x ̅ )=σ_x⁄√N
The quantity σ_x is a good estimate of our uncertainty in x ̅. Notice that the measurement precision increases in proportion to √N as we increase the number of measurements. The following example will clarify these ideas. Assume you made the following five measurements of a length:
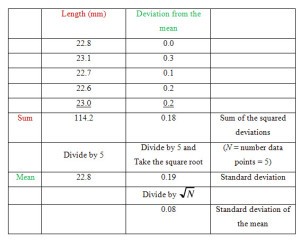
Error Calculation
Therefore, the result is 22.84±.08mm
In some cases, it is hardly useful to repeat a measurement many times. In that situation, you can estimate frequently the error by taking account of the smallest division of the measuring instrument.
For example, when using a meter stick, one can measure, perhaps a half or sometimes even a fifth of a millimeter. So, the absolute error would be estimated to be around 0.5 mm or 0.2 mm.
Thus, this is all about the various types of errors in measurement and error measurement calculation. We hope you are satisfied with this article. We express our gratitude to all the readers. Please share your suggestions and comments in the comment section below.